Development Host Terminal Emulator
Now that you have the physical connections made, you’ll need a Terminal Emulator application on your development host.
We provide instructions for a couple of alternatives here, but you only need to
install one of them. We recommend PuTTY because it supports both serial and network
connections and runs on Windows 10, MacOS and Linux.
The steps on this page walk you through this process.
Important
The instructions here (when discussing the Host) are for Windows systems.
The G3 module should not be powered on for all procedures on this page.
Finding the Right COM Ports on a Windows Host
Note
Windows COM Ports
Your COM port numbers will vary, depending on several factors:
Other serial devices plugged into your system,
Which USB port the cable is plugged in to,
Device driver revisions,
The time of day,
Which way the wind is blowing,
The phase of the moon,
Etc., etc., etc.
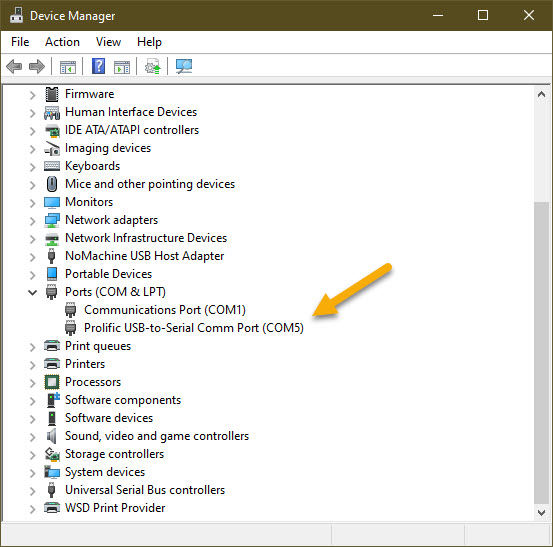
Open the Device Manager in Windows.
Expand the Ports (COM & LPT) section.
The cable should be listed as USB-to-Serial Comm Port or something very similar with a COM port number in parentheses. In the image below, the COM port number is 5.

Device Manager
Make note of this port. You will need it to define a terminal connection to the G3 module.
Repeat the steps above as necessary to identify the COM ports for the Debug Interface and the RS-232 port.
Note
Please substitute the COM ports listed on your machine for the following instructions, not the ones listed in our examples. Your values will almost certainly be different.
Install & Configure a Terminal Emulator
Next, you need to install at least one Terminal Emulator application. We suggest you may want to setup and try them both out and decide which you prefer.
Tip
You will need to configure two ports in your emulator; one for the Debug Interface, and one for the RS-232 port.
Setup PuTTY
Download and install the latest version of PuTTY.
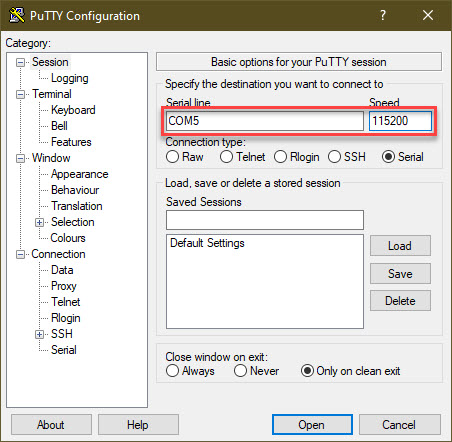
Configure the serial port settings for the Debug Interface:
Enter the settings as shown in the image below. Be sure to use the correct COM port as determined for your setup in the steps above and not the one shown in this example.

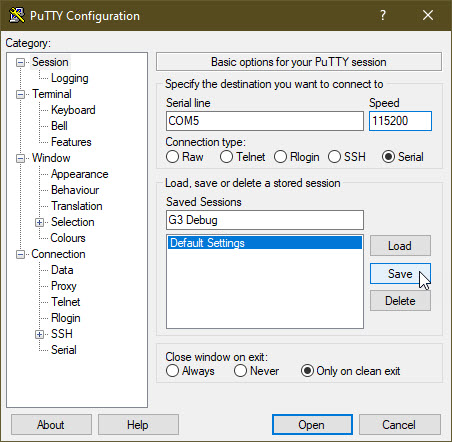
To save your port configuration for future use, enter an easy to remember session name in the Saved Sessions box (e.g., G3 Console or G3 Debug), and select Save.

Lather, rinse, repeat for the RS-232 port.
Footnotes:
- 1
You can also use this dialog to create an SSH session definition once you know the IP address of the G3 module.
Setup Tera Term
Download and install the latest version of Tera Term.
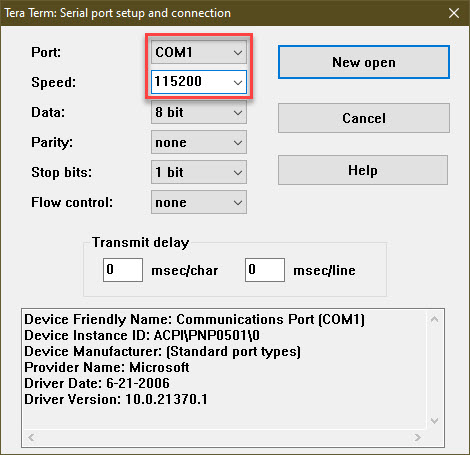
Configure the serial port settings for the Debug Interface:
Lather, rinse, repeat for the RS-232 port.
